Pulse Connect Secure VPN MFA Setup with Mideye
This guide explains how to configure Mideye two-factor authentication (MFA) for Pulse Connect Secure (now Ivanti Connect Secure) using RADIUS. After completing the steps below, VPN users will be prompted for a second authentication factor through the Mideye Server.
For general product information, refer to the official Pulse Secure documentation.
| Component | Supported versions |
|---|---|
| Pulse Connect Secure / Ivanti Connect Secure | 8.x / 9.x / 22.x |
| Mideye Server | 5.x / 6.x |
Prerequisites
Section titled “Prerequisites”- A running Mideye Server with RADIUS enabled (default UDP port 1812)
- The Pulse Secure appliance must be added as a RADIUS client in Mideye Server
- Administrator access to the Pulse Secure admin console
- Network connectivity between the Pulse Secure appliance and Mideye Server on UDP port 1812
Integration steps
Section titled “Integration steps”Log in to the Pulse Secure admin console at https://FQDN/admin.
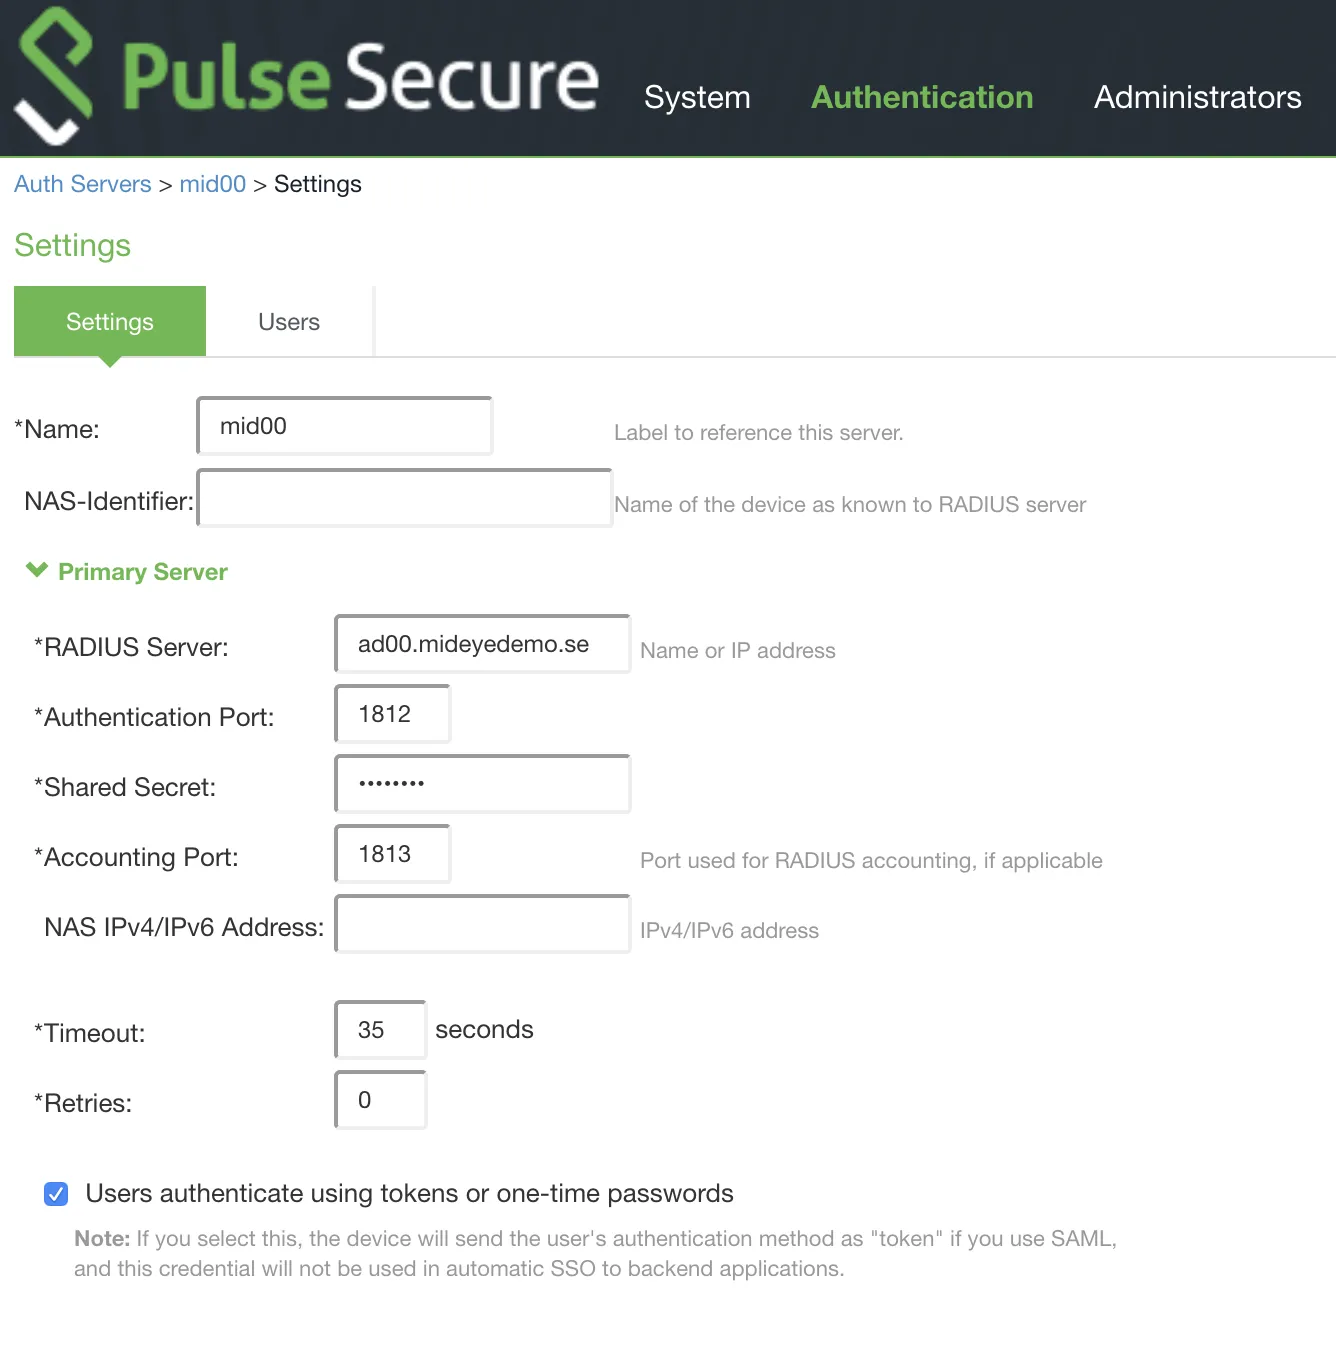
1. Create a new RADIUS authentication server
Section titled “1. Create a new RADIUS authentication server”Navigate to Authentication → Auth. Servers. Select RADIUS Server from the dropdown and click New Server…
Configure the following settings:
| Setting | Value |
|---|---|
| Name | Give the authentication server a friendly name |
| NAS-Identifier | Leave blank |
| RADIUS Server | Enter the IP or hostname of the Mideye RADIUS Server |
| Authentication port | 1812 (UDP, default) |
| Shared Secret | Enter a shared secret — must be identical on both the Pulse Secure appliance and the Mideye Server RADIUS client |
| Accounting | 1813 (UDP, default). This port must also be defined as a RADIUS Server in the Mideye Server |
| Timeout | 35 seconds. Required — gives fallback methods enough time to complete before the connection times out |
| Retries | 0 |
2. Configure custom RADIUS rules
Section titled “2. Configure custom RADIUS rules”Under Custom Radius Rules, click New RADIUS Rule to create two rules that handle Access-Reject and Access-Challenge responses from the Mideye Server.
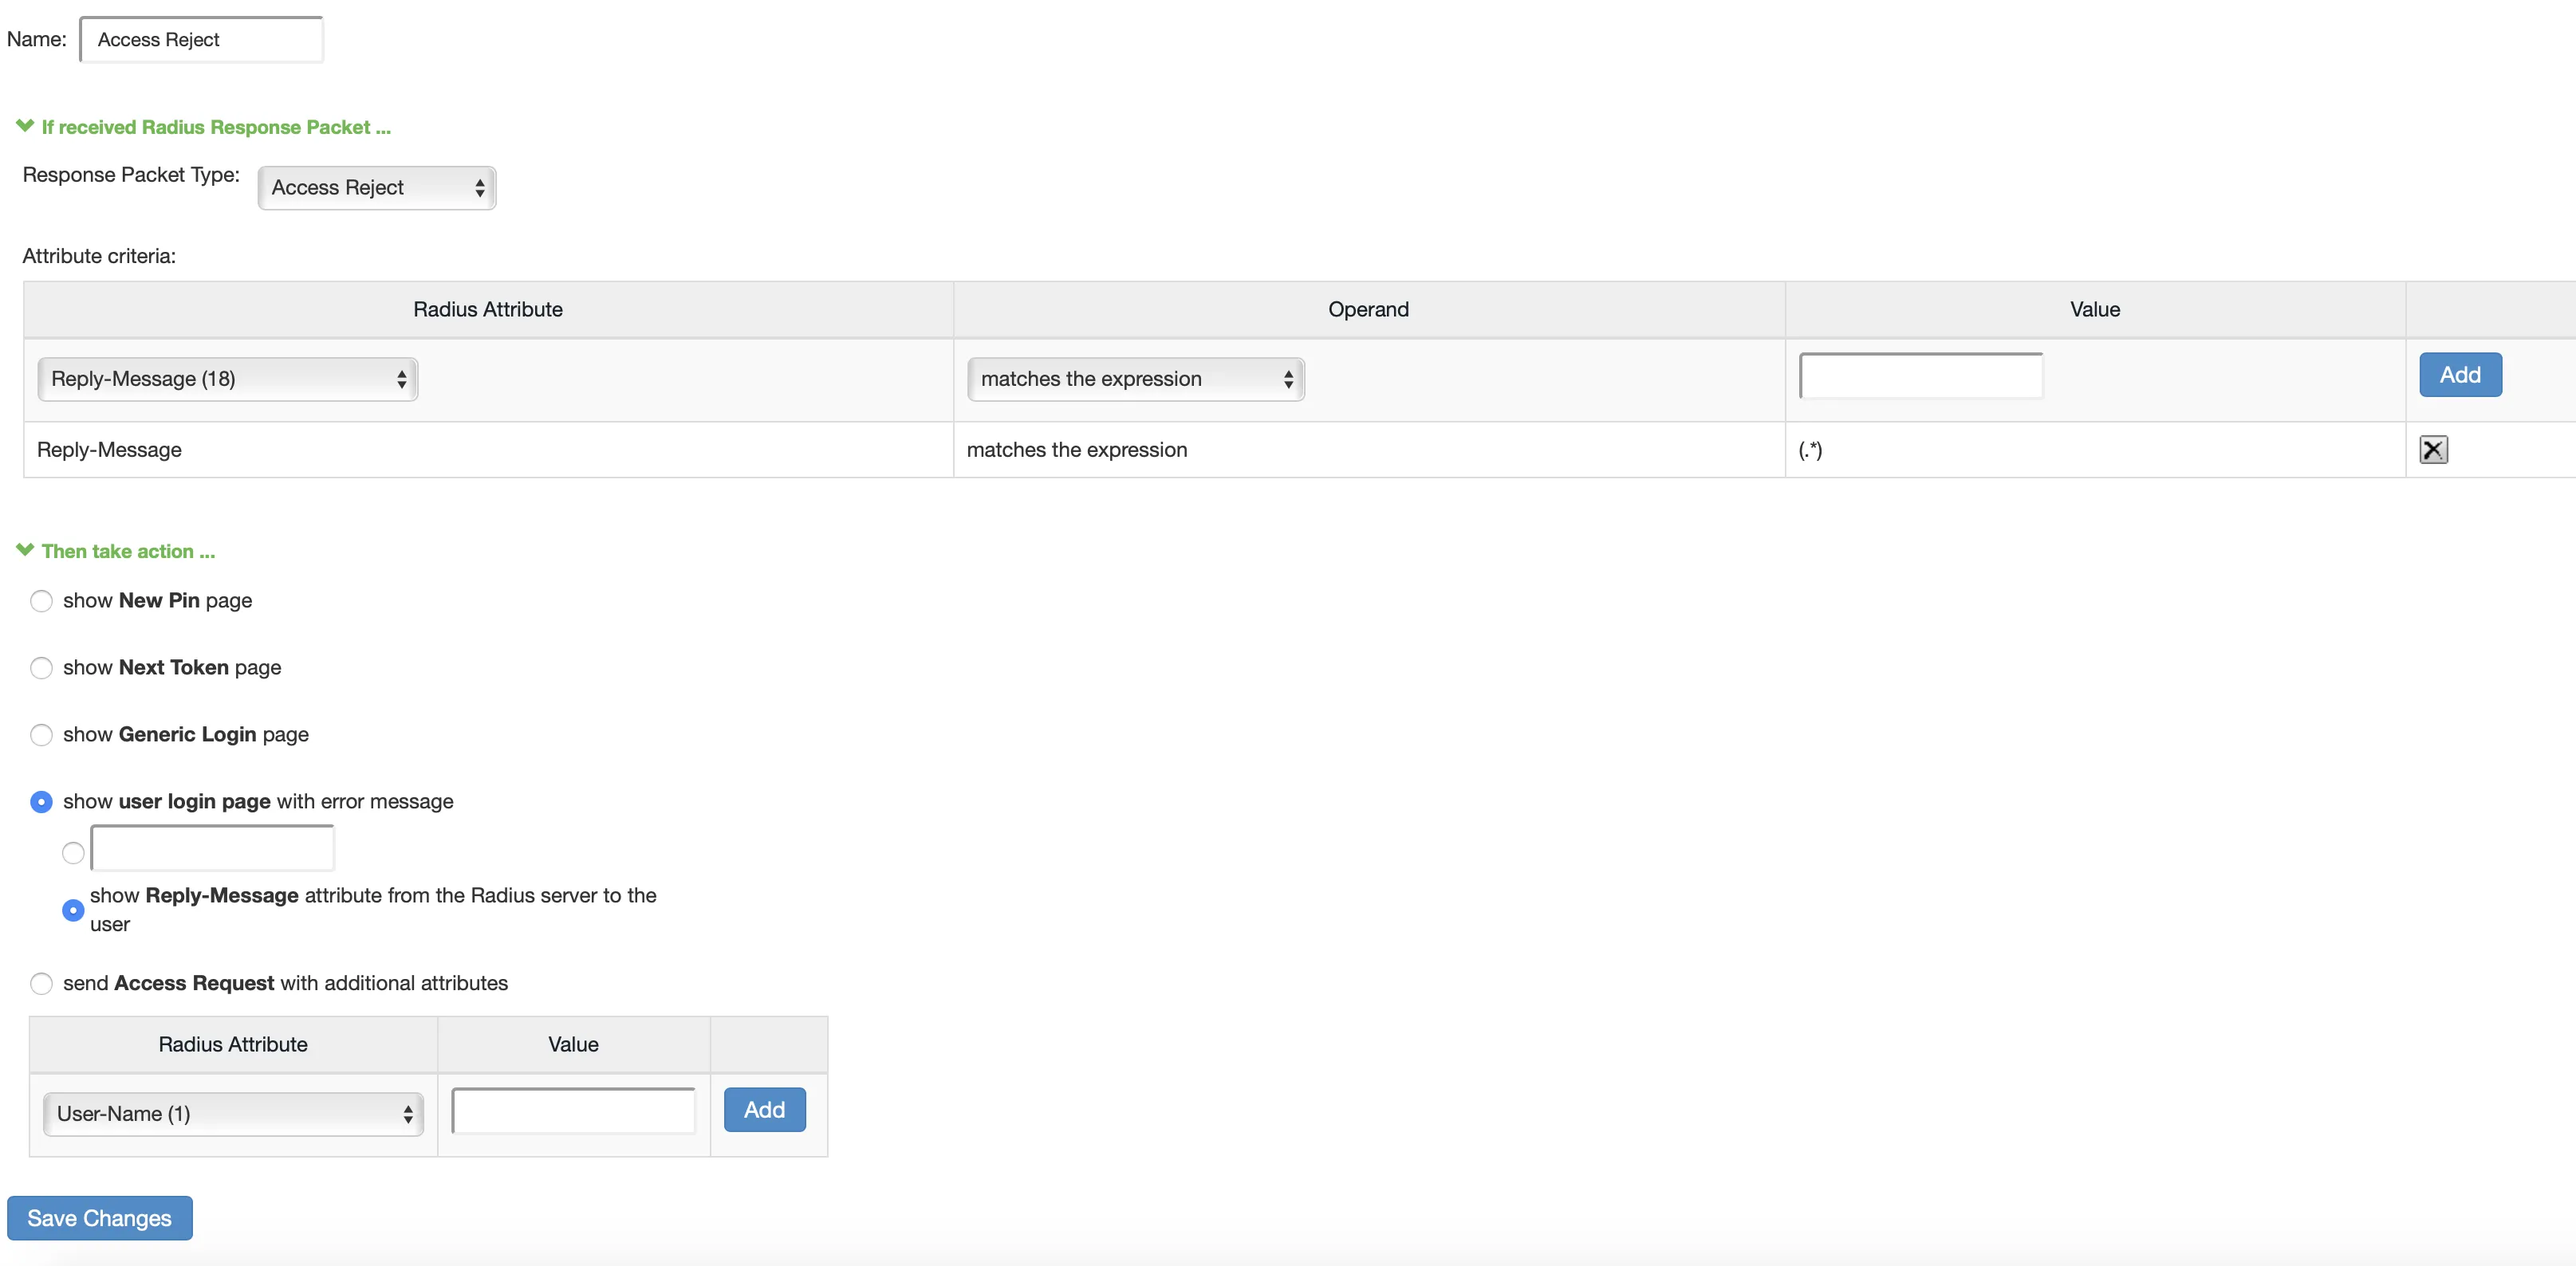
Access Reject rule
Section titled “Access Reject rule”Configure the Access Reject rule with the following settings:
| Setting | Value |
|---|---|
| Name | Access Reject |
| Response Packet Type | Access Reject |
| Attribute criteria | Radius Attribute: Reply-Message (18), Operand: matches the expression, Value: (.*) |
Then select Show user login page with error message → Show Reply-Messages attribute from the RADIUS server to the user.
Click Save Changes.
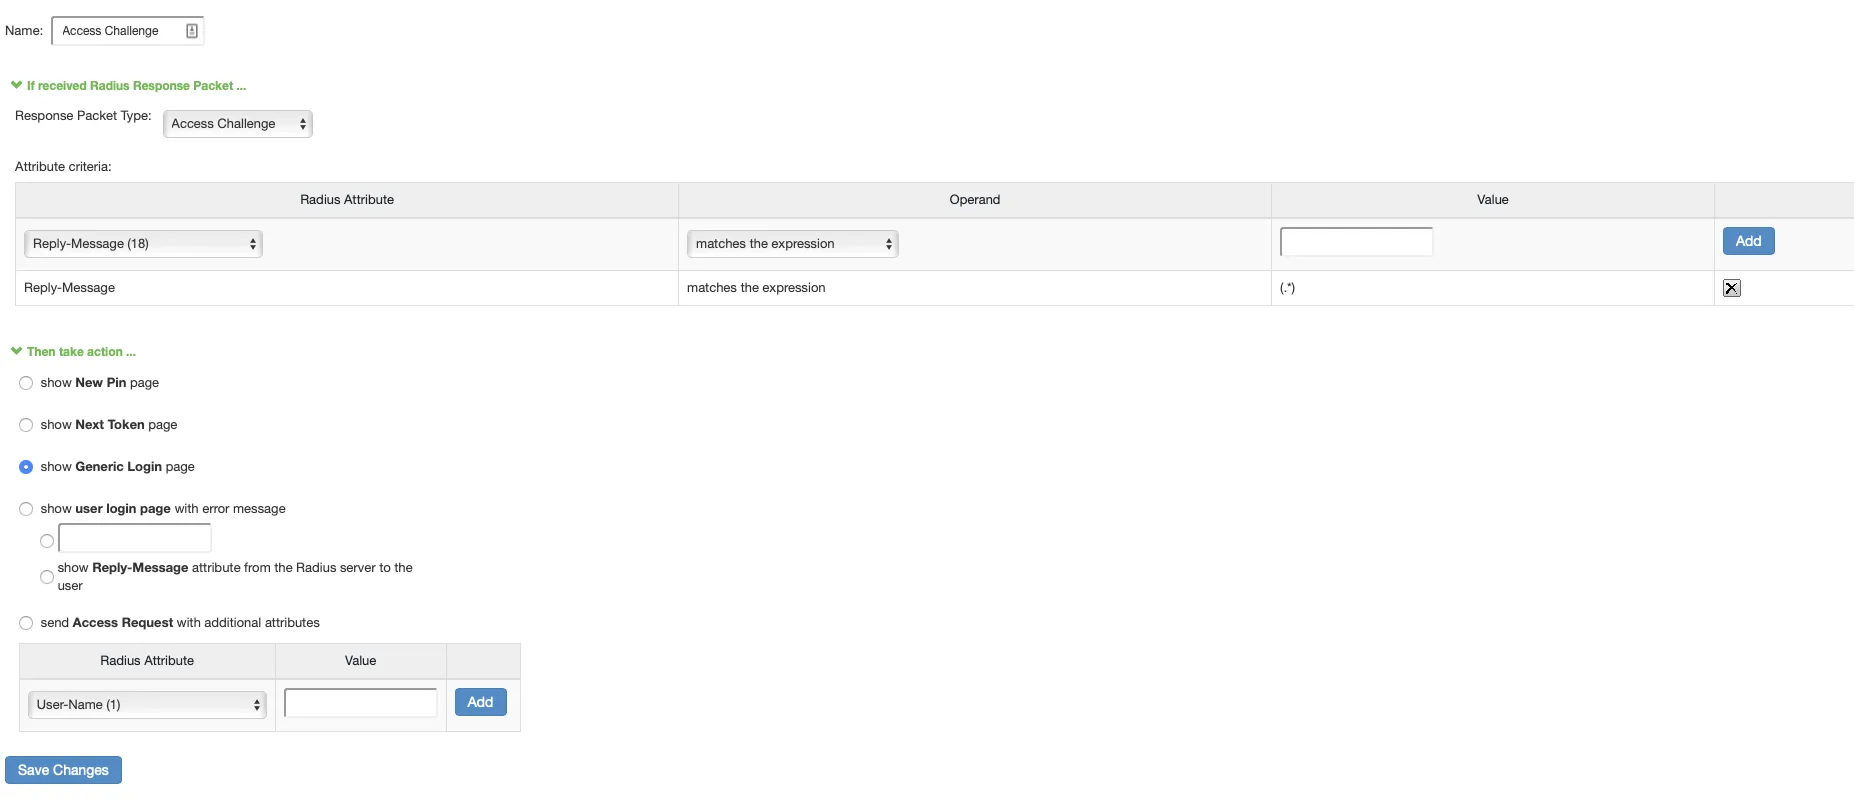
Access Challenge rule
Section titled “Access Challenge rule”Click New RADIUS Rule again and configure the Access Challenge rule:
| Setting | Value |
|---|---|
| Name | Access Challenge |
| Response Packet Type | Access Challenge |
| Attribute criteria | Radius Attribute: Reply-Message (18), Operand: matches the expression, Value: (.*) |
Then select Show Generic Login page.
Click Save Changes.
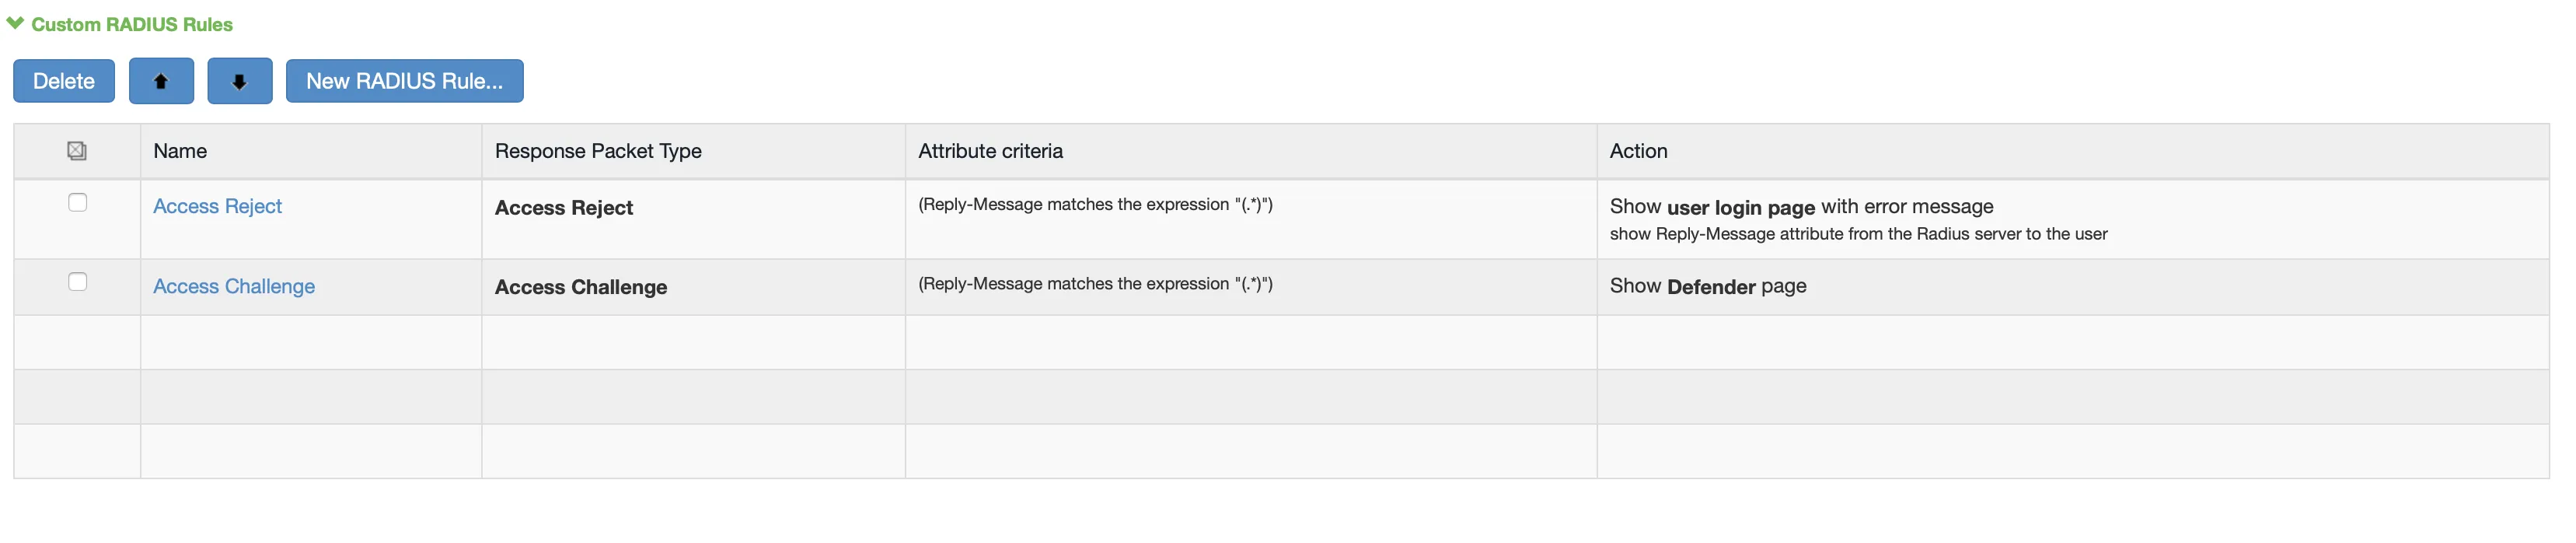
After creating both rules, the Custom Radius Rules list should show both the Access Reject and Access Challenge entries:
Click Save Changes to save the authentication server.
3. Apply the authentication server to a user realm
Section titled “3. Apply the authentication server to a user realm”Navigate to Users → User Realms and select the realm that should be protected with Mideye authentication. Add the RADIUS server created above and click Save Changes.
For further details on configuring user realms, refer to the Pulse Secure User Realm Configuration guide.
Troubleshooting
Section titled “Troubleshooting”| Symptom | Check |
|---|---|
| Authentication fails / times out | Verify that the RADIUS timeout is set to 35 seconds and retries is 0 |
| No RADIUS logs in Mideye Server | Verify UDP port 1812 is open between the Pulse Secure appliance and Mideye Server |
| Shared secret mismatch | Ensure the secret configured in Pulse Secure matches the RADIUS client in Mideye Server exactly |
| OTP prompt does not appear | Verify the Access Challenge custom RADIUS rule is configured and saved |
| Generic error instead of Mideye message | Verify the Access Reject custom RADIUS rule is configured to show Reply-Messages |
Check RADIUS logs
Section titled “Check RADIUS logs”Verify that authentication requests are reaching the Mideye Server by checking the RADIUS log file:
Mideye Server\log\radius-messages.logIf the log file shows no entries, check firewall rules and network routing between the appliance and Mideye Server.
Related links
Section titled “Related links”Mideye documentation
Section titled “Mideye documentation”- RADIUS Clients — add the Pulse Secure appliance as a RADIUS client in Mideye Server
- RADIUS Integrations — authentication flows and supported auth types
- Authentication Types — all supported Mideye authentication methods
- RADIUS Timeout — how the timeout affects authentication
- Support Center — contact Mideye support for integration assistance
Official Pulse Secure / Ivanti documentation
Section titled “Official Pulse Secure / Ivanti documentation”- Pulse Secure documentation — product documentation hub
- Ivanti Connect Secure documentation — current Ivanti documentation